Wednesday, December 28, 2011
New Year's Day queso compuesto
A year or so ago, I was visiting Texas in August and stopped by my grandma’s farm to say howdy. She asked if I was hungry, as she’d just cooked up a pot of black-eyed peas. How could I refuse? We sat down at the table and ate big bowls of the freshly picked peas along with Swiss chard cooked with bacon and warm cornbread slathered in butter. It was a fine late-summer feast using up the bounty of her garden.
Now, this time of year people start thinking more about black-eyed peas, greens and pork as they’re required eating for good fortune in the New Year. A meal such as the one I shared with my grandma would not be out of place on New Year’s Day. But these foods for us are an essential part of life and we eat them all year long, not just on January 1.
This isn’t to say, however, that I won’t be having black-eyed peas, greens and pork on Sunday. But I like to take a little license with these ingredients and take them on a journey to a new place.
And that’s how I arrived at my New Year’s Day queso compuesto.
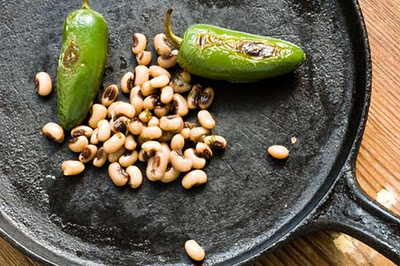
The last time I was dipping into a queso compuesto, I asked myself, “What would this taste like with Mexican chorizo, black-eyed peas and collard greens?” Was it kind of crazy or kind of good? I decided to find out.
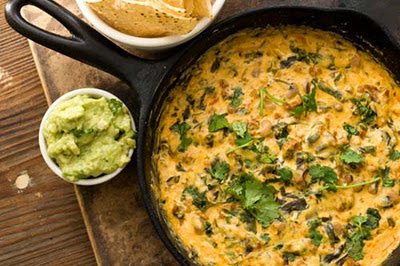
For those of you wondering what the heck is queso compuesto, let me explain. Queso the dish is melted cheese mixed with chiles—hence it’s official name, chile con queso. (The word "queso in Spanish means cheese.) In Texas, this melted cheese is usually of the yellow processed variety, though sometimes we make queso with non-processed cheese instead. Queso compuesto then takes this bowl of queso and makes it better by adding stuff such as taco meat, refried beans, guacamole and pico de gallo. It’s one outrageous dip.
Now, melted cheese goes with just about anything savory. And earthy black-eyed peas, smoky collard greens and spicy Mexican chorizo are good friends, too. But for some reason I worried that combining these three with melted cheese would be a bit much. I shouldn’t have—this dip lasted about a minute and even people who think they don’t like black-eyed peas couldn’t get enough.
Of course, if you’re not a fan of black-eyed peas, chorizo or collards, you can make endless substitutions—though I have to say that it is fun combining Southern comfort with Tex-Mex, plus I guarantee that your guests will be very impressed with this twist on a classic.
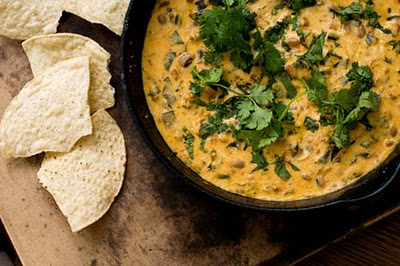
This queso compuesto might just be my new favorite way to begin a new year, especially if you’re gathering with friends and family and want something to keep them occupied while you work on the main meal. And sure, it may be a little decadent and go against those resolutions, but don’t worry—salads and soups will still be around on January 2.
Happy New Year! May your 2012 be filled with lots of love and joy.
New Year’s Day queso compuesto
Ingredients:
1 tablespoon vegetable oil
1/2 pound Mexican chorizo, removed from any casing
1/4 medium onion, diced
6 roasted jalapeños, seeds and stems removed, diced
2 cups cooked collard greens, drained and finely chopped
2 cups cooked black-eyed peas, drained or one 15-ounce can of black-eyed peas, drained
8 ounces cream cheese, cubed
4 cups shredded Muenster (16 ounces)
1/2 cup half-and-half
1 teaspoon lime juice (optional)
1/2 cup chopped cilantro
Salt to taste
Tortilla chips
Method:
Preheat the oven to 375 degrees. In a large oven-proof skillet, such as a cast iron skillet, heat the oil on medium low and add the Mexican chorizo and onion. While stirring occasionally to break up any large chunks of chorizo, cook until the chorizo and onions are cooked through, about 5-8 minutes. Remove the skillet from the heat and if you like, drain off any excess grease.
Stir into the skillet the diced jalapeños, black-eyed peas and collard greens. Evenly distribute on top the cubed cream cheese and shredded Muenster then pour in the half-and-half. Bake uncovered until the cheese is bubbling, about 15-20 minutes. Remove from the oven and gently stir to combine everything. If you’d like a little tang, you can squeeze in some lime juice. Garnish with chopped cilantro and add salt to taste. Serve with tortilla chips
Yield: 8 servings
Note: To roast the jalapeños, place under the broiler for 10 minutes until blackened, turning once. To keep the dip warm, you can place on a chafing dish, in a slow cooker or in a fondue pot.
Wednesday, December 21, 2011
Complexion candy, a date, fig and pecan confection
The other day I found myself in a cookie coma. After eating nothing but cookies and homemade candy for several hours straight, my belly hurt and I could barely keep my eyes open. It was a sugar, butter and white flour overload.
Now, I’m not one to pass up a sweet treat, especially this time of year. But sometimes it might be wise for me to cut back just a little so I won’t find myself shopping for a whole new wardrobe in the new year.
Enter complexion candy. “What kind of candy?” you may be asking. I said the same thing when I came across this old Texan recipe. Though upon closer inspection I realized that complexion candy is simply an old-fashioned dried fruit and nut confection under a more colorful name.
I love dates. They’re sticky, crunchy and sweet with such a rich caramelized flavor that it’s hard to believe that they’re a fruit. Yep, dates are nature’s candy. And that’s what’s at the heart of complexion candy, along with figs, raisins, orange zest and pecans.
It's a snap to make this, as you simply throw all the ingredients into a food processor and whirl away until a smooth paste forms. Then you can either roll it into balls and dip it in coconut or chopped pecans, or you can press it into a pan and cut it into squares after chilling.
The original recipe called for sprinkling the complexion candy with powdered sugar, but I didn't think it added much, so I skipped that step. You, however, may disagree. But one thing that we can agree on is that complexion candy is a guilt-free sweet. It’s also extremely versatile. For instance, you can sub in other dried fruits if you like, add a bit of ginger and cinnamon for a little spice, use walnuts if you prefer, or if you’re feeling really decadent throw in some chocolate chips or chopped bacon.
If you’re a fan of fig bars or Lara Bars, then this is for you. Now, I would never advocate getting rid of the pralines, the brittlesfestive cookie tray and other holiday treats that always makes the season bright, but you might consider giving complexion candy a try. And you know what? You might just be surprised.
Complexion candy
Ingredients:
2 cups dates
2 cups dried figs
1/2 cup raisins
1/4 cup roasted pecans
1 tablespoon orange zest
1/2 cup shredded coconut
1/4 cup chopped nuts, such as pecans, walnuts or pistachios
Method:
Place the dates, dried figs, raisins, pecans and orange zest in a food processor and blend until a paste forms. Form into 1-tablespoon-sized balls and dip in shredded coconut and/or chopped nuts. Alternatively, you can press the paste into a pan, chill for an hour and then cut into squares.
Variations: You can replace the pecans with walnuts or almonds. You can also dip the balls into chopped nuts. For more flavor, try adding a pinch of ginger, cinnamon and clove. To make them even more decadent, you can add chocolate chips or chopped bacon.
Friday, November 11, 2011
Sweet potato salad with cranberries and pecans
“What are you cooking this week?” asked my grandma. I told her I was making sweet potatoes. “They’re good for your eyes!” she said.
My grandma loves her sweet potatoes, as does most of my family. I, however, only eat them when they’re mashed or pureed as in soups or pies. Other preparations—such as sweet potatoes with marshmallows or sweet potato fries—are just a bit too much for me. I can’t explain it.
But at my cousin’s wedding in August I had a revelation. My cousin Lisa, like everyone in my family, loves to cook. And when her daughter Sarah announced her wedding, Lisa said, “I’m catering it.” It was a huge party and preparing a dinner for so many folks was a herculean task, but Lisa gathered up her friends and with their help she pulled it off with grace and elegance.
It was a fine feast made all the better because it was prepared with love. Everything was delicious, but there was one salad that stood out on a table overflowing with goodness. The salad was nutty, creamy, earthy yet sweet and was the sort of dish that made you pause because you weren’t quite sure what you’d eaten, but you quickly took another bite because you knew you wanted more. I couldn’t figure out exactly what it was, but I loved it anyway.
Then it hit me.
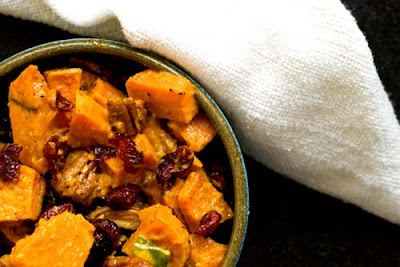
“Wait. Are these sweet potatoes?” I asked the people sitting at my table. My mom said that they were. “But it tastes so good and I don’t like sweet potatoes!” I said. She agreed that it was one incredible dish. In fact the whole table was chatting about this simple salad comprised of sweet potatoes, crunchy pecans and tart dried cranberries tossed in a curry-laced dressing. It was quite the surprise.
The next day, I insisted that Lisa give me the recipe. It turned out to be one of her friend’s recipes and she promised to send it to me. “This would be perfect for Thanksgiving!” I said.
Now, while this is a cold salad, sweet potatoes, pecans and cranberries are in season and this dish still says autumn to me. Even if you’re the kind of person that often finds sweet potatoes a bit cloying I know you’ll enjoy this.
Plus, as my grandma says, sweet potatoes are good for your eyes!
Sweet potato salad with cranberries and pecans
Ingredients:
4 pounds sweet potatoes (about 2 or 3 large), peeled and cut into 3/4-inch cubes
1/2 cup mayonnaise
2 teaspoons curry powder
1 teaspoon coarse-ground mustard
2 green onions, sliced
1 cup dried cranberries
½ cup roughly chopped pecans, lightly toasted
Salt and pepper to taste
Method:
Preheat the oven to 350 degrees and lightly grease a baking sheet. Place the cubed sweet potatoes on the sheet and bake until cooked but firm, about 35-40 minutes.
In a large bowl, whisk together the mayonnaise, curry powder and mustard. Stir in the green onions, cranberries, pecans and cooked sweet potatoes. Adjust seasonings and add salt and pepper to taste. Chill for at least three hours before serving.
Yield: 4 servings
Note: My cousin adds 1 tablespoon of brown sugar when she makes this, but I find it’s plenty sweet with the sweet potatoes and cranberries. If you want it to be sweeter, you might try it that way.
Friday, November 4, 2011
Stuffed pumpkin with cheese, bacon and chipotle chiles
The day before I left for my Texas tour, I made an incredible dish. It was a baked pumpkin stuffed with bread, Gruyere, sharp white cheddar, bacon, chipotle chiles, cream and garlic. After spending some time in the oven, it emerged filled with a rich, savory and spicy filling that was perfect for spooning onto a plate as an autumnal side dish. I was smitten.
After taking photos and writing down my changes to the two recipes I adapted (one from Dorie Greenspan and another from Ian Knauer), I packed my suitcases and focused on signing books instead of blogging. My goal had been to share this with you from the road, but between events I was simply too busy to write. Any mention of it would have to wait.
In my mind, pumpkins are most associated with Halloween and when October ended, I thought I’d missed my opportunity. But when I told my mom about the stuffed pumpkin she said, “We should serve that at Thanksgiving!” And she’s right—it’s not too late and indeed we do!
Before we continue talking about this pumpkin, however, please allow me to say a few words about my time in Texas. I can’t tell you how incredible it was meeting so many of you! When you write for a living, you spend much of your time alone in front of a computer, so being able to go out and hear your stories and match faces to familiar names was extremely edifying. What a friendly, smart and generous bunch y’all are!
A big thank you to all who made it out to the events—seeing you definitely made my day! (If you weren’t able to attend and you’d like a signed copy of my book, head on over to my book page for information on how to order one.)
Now back to that pumpkin. They are still in season and if you’re looking for something dramatic to share at the table, then this cheese-stuffed pumpkin with bacon and chipotle chiles will definitely bring both smiles and sighs. Mom had suggested we serve it at Thanksgiving as an appetizer, which will work. But I think it could make for an unusual take on dressing, too.
If you’re a fan of nutty melted cheese, crisp bacon and smoky chipotle chiles, then there’s no need to wait until Thanksgiving to enjoy this pumpkin. Sure, it takes some time to bake, but the preparation is a snap. And with just a little planning you can have a festive dish that will bring light and warmth to the table as the days grow shorter and darker.
Stuffed pumpkin with cheese, bacon and chipotle chiles (adapted from recipes by Dorie Greenspan and Ian Knauer)
Ingredients:
One 3-to-4 pound pumpkin
Salt and black pepper to taste
4 ounces French bread, cut into 1/2-inch cubes
1/4 pound Gruyere, shredded (1 cup)
1/4 pound white cheddar, shredded (1 cup)
4 cloves garlic, minced
1 or 2 chipotle chiles en adobo, diced (depending on how fiery you want it)
1/4 pound cooked bacon, crumbled
1/4 teaspoon ground cumin
Small pinch of nutmeg
1/2 cup heavy cream or half-and-half
Method:
Arrange a rack in the center of the oven and preheat the oven to 350 degrees. Line a 9x13 casserole pan or baking pan with foil or parchment paper.
With a sharp knife, cut a circle around the pumpkin stem about 1 inch away from the stem. Remove the top and clean out the seeds and stringy bits from inside the pumpkin. (You can save the seeds for roasting, if you like.) Lightly salt and pepper the inside of the pumpkin.
Toss together the bread cubes, shredded Gruyere, shredded cheddar, garlic, diced chipotle chiles and cooked bacon, and stuff into the pumpkin. Stir the cumin and nutmeg into the cream, adding a bit of salt and black pepper to taste. Pour cream mixture into pumpkin over bread and cheese.
Place the top back on the pumpkin, and place the pumpkin into the baking pan. Bake for 1 1/2 hour to 2 hours or until filling is brown and bubbling. To serve, remove the top and spoon out portions of the filling along with bits of the cooked pumpkin. You can either leave it in the pan, or by using the foil or parchment paper, you can carefully lift it out of the pan and place it on a platter. Serve warm.
Yield: 4 servings
Tuesday, September 20, 2011
Chopped beef sandwich with a spicy barbecue sauce
Last month, when I driving down 290 on my way to my cousin’s wedding weekend in Bryan, I passed my alma mater—Cy-Fair High School. School wasn’t set to begin until the following week, but I saw lights shining on the football field and the stands filled with people decked out in our school’s colors—maroon and white. It took me a second and then I remembered it was Friday night. I quickly exited the highway, turned around my car and headed back to campus to see what was happening.
When I pulled up to the field, I saw a sign announcing a pre-season scrimmage between Cy-Fair and Tomball. There were no cheerleaders, and the marching band was practicing its songs and routines in the parking lot, not in the stands. But it was Friday night and the lights were lit. And even if this game didn’t count—the level of energy and excitement was electric. It was a feeling I hadn’t experienced since the last time I was at a Bobcat game my senior year in high school.
“Welcome home!” I said to myself.
Now, as passionate as my friends and I were about our 5A team back in the day, the true highlight of any game—besides the socializing—was the eating. Frito pies, chili dogs, roasted peanuts, dill pickles and popcorn were standard fare sold by the boosters at every game, a common menu found at high school stadium concession stands across the state. But some nights, the boosters would also offer their famous chopped beef sandwiches. And you know what? That night was one of those nights.
Chopped beef sandwiches are not only found at football games, but they're also found at most Texan barbecue joints, rodeos and local fairs, too. It’s a simple sandwich, as it’s just finely chopped brisket tossed in sauce and then stacked tall on a soft bun with pickles, onions and jalapeños. But when done well, a chopped beef sandwich is just as satisfying as a stack of sliced brisket and ribs on a sheet of butcher paper. Plus a sandwich is more portable, which makes it perfect for eating while watching a game.
Smoked brisket is the traditional meat of choice for a chopped beef sandwich. The sandwich I had at the scrimmage was no different, as before I even entered the stands I could smell the post oak smoke wafting from the portable smoker manned by the boosters. But I have a confession to make. Because this is a sauced sandwich, I can make them at home without a smoker and feel equally satisfied. This may get me in trouble with some purists, but when you have moist brisket, a spicy barbecue sauce, plenty of onions, pickled jalapeños and a tender bun, I believe you won’t miss the smoke.
For the brisket, I just slow roast it in the oven until it’s tender. While there’s plenty of flavor in the meat, I think the sauce is also important; I serve mine with a fiery, tomato-based sauce that was inspired from a recipe purported to be from Rudy’s. While I was intrigued that the recipe used both ketchup and tomato sauce, I ended up changing the rest of the ingredients to make it less sweet and more fiery. A spoonful of molasses, dashes of cayenne and cumin do their part. A generous helping of black pepper also gives this sauce plenty of power and life.
Of course, you certainly don’t need a football game as an excuse to serve these chopped beef sandwiches, they are excellent at any time. But if you have a hankering for some rousing songs, a roaring crowd and the drama that can only be found on the field on a Friday night—eating these sandwiches might just take you back to that place, even if you haven’t visited in a long time.
Chopped beef sandwiches with spicy barbecue sauce
For the brisket:
1/2 tablespoon salt
1/2 tablespoon black pepper
1/4 teaspoon cayenne
1 3- or 4 -pound brisket, the flat cut, with some fat still on it
1 large yellow onion, quartered
4 cloves garlic, cut in half
For the spicy barbecue sauce:
Ingredients:
1 cup canned tomato sauce
1 cup ketchup
2 tablespoons apple cider vinegar
1 tablespoon Worcestershire sauce
2 tablespoons lemon juice
2 cloves garlic, finely minced
1 teaspoon molasses
1 teaspoon black pepper
1/4 teaspoon ground cumin
1/4 teaspoon cayenne pepper
Pinch of ground cloves
Salt to taste
For serving:
8 warm buns
Sliced onions
Pickled jalapeño slices
Dill pickle slices
Method:
To prepare the brisket, preheat the oven to 275 degrees. Mix together the salt, black pepper and cayenne, and sprinkle on both sides of the brisket. In a roasting pan, place quartered onions at the four corners and lay the brisket, fat side up, on top of the onions, so it’s slightly elevated. Place the garlic on top of the brisket, and add 1/4 cup of water to the pan. Cover the pan tightly with foil and cook in the oven for five hours or until fork tender.
While the brisket is cooking, make the sauce. Mix together in a saucepan the tomato sauce, ketchup, apple cider vinegar, Worcestershire sauce, lemon juice, garlic, molasses, black pepper, cumin, cayenne and pinch of cloves. Bring to a boil and then simmer for 30 minutes. Adjust seasonings and add salt to taste.
Once you take the brisket out of the oven (you might first check that it’s tender enough), let it sit covered for 30 minutes. Lift the brisket out of the pan and finely chop, adding some of the pan juices. Toss the brisket with some of the sauce until desired sauciness is achieved, and serve on warm buns with onions, pickled jalapeños and dill pickle slices, with additional sauce on the side.
Yield: 6-8 sandwiches
Thursday, June 16, 2011
Store Food in Aluminum Foil?
Is it harmful to cook or store food in aluminum foil?
We do not recommend cooking or storing food in aluminum foil-even though there is no strong scientific evidence showing these practices to be harmful to your health. We have three reasons for making this recommendation. First, even though research studies don't show the food use of aluminum foil to be harmful, they clearly show migration of small amounts of aluminum from the foil into the food. For example, in one study conducted in Italy about 2-6 milligrams of aluminum was found to move over into food from aluminum foils, cookware, and utensils. Even if this amount has not been show to pose health harm, we don't like our food containing a potentially problematic metal that wasn't naturally supposed to be there.
Second, we believe that the jury is still out on aluminum with respect to chronic long-term health problems. (We're talking here about exposure to aluminum from all sources, including the environment, certain workplace settings, personal care products, etc.) Potential connections have been found between certain cancers and aluminum exposure, and also between aluminum exposure and Alzheimer's disease. Infertility connections have also been found. We don't see any reason to add potential exposure through the use of aluminum foil with food.
Finally, we don't like the consequences of aluminum foil manufacturing for our planet. Aluminum remains on the federal government's list of priority toxins for the United States, and its mining, manufacture, and post-use disposal pose significant problems for our environment. From our perspective, while aluminum foil is definitely lightweight, flexible, and convenient, these upsides don't come close to outweighing the downsides here.
References
- Gramiccioni L, Ingrao G, Milana MR, et al. Aluminium levels in Italian diets and in selected foods from aluminium utensils. Food Additives and Contaminants. 1996; 13(7):767-774. 1996.
- Lopez FE, Cabrera C, Lorenzo ML, et al. Aluminum levels in convenience and fast foods: in vitro study of the absorbable fraction. Sci Total Environ 2002;300(1-3):69-79. 2002.
- Nayak P. Aluminum: impacts and disease. Environ Res 2002;89(2):101-15. 2002.
- Pratico D, Uryu K, Sung S, et al. Aluminum modulates brain amyloidosis through oxidative stress in APP transgenic mice. FASEB J 2002;16(9):1138-40. 2002.
- Rondeau V. A review of epidemiologic studies on aluminum and silica in relation to Alzheimer's disease and associated disorders. Rev Environ Health 2002;17(2):107-21. 2002.
- Soni MG, White SM, Flamm WG, et al. Safety evaluation of dietary aluminum. Regul Toxicol Pharmacol 2001;33(1):66-79. 2001.
- Sugita T, Ishiwata H, Yoshihira K. [Migration of heavy metals into food-simulating solvents from aluminum pans]. Eisei Shikenjo Hokoku 1988;(106):124-6. 1988.
Labels:
Cooking Tips,
healthy and food news
Florists Muffins
This muffin has a little bit of everything - carrots, raisins, apple butter, wheat germ, nuts. A perfect start for your day!
Ingredients
- 1 1/2 cups all-purpose flour
- 1/2 cup whole wheat flour
- 1 1/4 cups white sugar
- 1 tablespoon ground cinnamon
- 2 teaspoons baking powder
- 1/2 teaspoon baking soda
- 1/2 teaspoon salt
- 2 cups grated carrots
- 1 apple - peeled, cored, and chopped
- 1 cup raisins
- 1 egg
- 2 egg whites
- 1/2 cup apple butter
- 1/4 cup vegetable oil
- 1 tablespoon vanilla extract
- 2 tablespoons chopped walnuts
- 2 tablespoons toasted wheat germ
Directions
- Preheat oven to 375 degrees F (190 degrees C). Lightly oil 18 muffin cups, or coat with nonstick cooking spray.
- In a medium bowl, whisk together eggs, egg whites, apple butter, oil and vanilla.
- In a large bowl, stir together flours, sugar, cinnamon, baking powder, baking soda and salt. Stir in carrots, apples and raisins. Stir in apple butter mixture until just moistened. Spoon the batter into the prepared muffin cups, filling them about 3/4 full.
- In a small bowl, combine walnuts and wheat germ; sprinkle over the muffin tops.
- Bake at 375 degrees F (190 degrees C) for 15 to 20 minutes, or until the tops are golden and spring back when lightly pressed.
Labels:
Healthy Food,
healthy menu
Wednesday, June 15, 2011
Apple Banana Cupcakes
"This is a cupcake that smells as good as it tastes. It's an old Polish recipe from some of the best bakers in Milwaukee!"Ingredients
- 2 cups all-purpose flour
- 1 teaspoon baking soda
- 1 teaspoon salt
- 1/2 teaspoon ground cinnamon
- 1/2 teaspoon ground nutmeg
- 2/3 cup shortening
- 1 1/4 cups white sugar
- 2 eggs
- 1 teaspoon vanilla extract
- 1/4 cup buttermilk
- 1 cup ripe bananas, mashed
- 2 apples - peeled, cored and shredded
Directions
- Preheat oven to 375 degrees F (190 degrees C). Grease and flour 24 muffin cups, or use paper liners. Sift together the flour, baking soda, salt, cinnamon, and nutmeg. Set aside.
- In a large bowl, cream together the shortening and sugar until light and fluffy. Beat in the eggs one at a time, then stir in the vanilla and buttermilk. Beat in the flour mixture, mixing just until incorporated. Fold in the mashed bananas and shredded apples. Fill each muffin cup half full.
- Bake in the preheated oven for 20 to 25 minutes, or until a toothpick inserted into the center comes out clean. Allow to cool.
Labels:
Healthy Food,
World Recipe
Tuesday, June 14, 2011
Park Coffee Ice Cream
This recipe is an attempt to emulate 'ParkCoffee Ice Cream' made by an ice cream maker in Santa Barbara, California. It comes very close. If you like coffee-flavored ice cream, you'll like this.
Ingredients
- 1 1/2 cups water
- 2 cups white sugar
- 1 1/2 cups heavy cream
- 1 1/2 cups milk
- 6 egg yolks
- 3 tablespoons instant coffee granules
- 2 tablespoons finely ground coffee (optional)
Directions
- Bring the water and sugar to a boil in a saucepan over high heat until the sugar dissolves and the syrup turns clear. Pour into a double boiler along with the cream and milk. Whisk until the syrup has dissolved into the milk, then whisk in the egg yolks and instant coffee until completely incorporated.
- Set the double boiler insert over (but not touching) a pan of gently simmering water. Cook, stirring constantly until the custard has thickened and will stick to the back of a spoon, about 10 minutes. Pour through a mesh strainer into a bowl and stir in the coffee grounds. Refrigerate several hours until cold.
- Pour into an ice cream maker and freeze according to manufacturer's directions.